If you’ve visited an arcade in Asia, you might have seen a couple of arcade games which blatantly rip-off popular titles. Here’s a video of a Plants vs Zombies game in Singapore taken by YouTube user JasperLee93:
Here’s another one with Angry Birds (filmed at a local arcade by user Stug50):
At first glance, the game boils down to:
- Enemies randomly spawn and move around the screen.
- Insert coin to get energy which you can spend to shoot at enemies.
- Killing enemies give you additional energy based on their toughness.
Upon realizing how simple the game is, I decided to finally fulfill my childhood dream of programming my own arcade game. I’ve got spare time, decades of experience in programming, basic game development knowledge… it shouldn’t be that hard to pick up an HTML5 library as a web dev and build a game this simple, right?
Turns out the answer to that question is “It’s both easy and hard.”
Before we explain why that is so, let’s first take a deeper look at the games we’re cloning.
Fishing games?
If you’ve walked around the arcades that carry these games, you’ll see that there are other games in the same class but don’t infringe copyrights. For example, this “Demon Hunter” game shows up a lot in local arcades:
After doing a bit of lazy research, I’m pretty sure that this is where the whole thing started:
Yes, fishing games.
The gameplay is pretty much the same. Insert credits to get points. Use points to shoot targets which in turn gives you more points. Game ends when you run out or decide to redeem your points. There’s also some additional factors in play:
- The game is not damage based, but luck based. Enemies who drop higher rewards have a lower chance of being destroyed, and higher powered weapons which have higher chance of destroying these enemies cost more points/energy to use.
- Since it’s luck based, the game developer can tweak the probabilities such that playing an optimal strategy would only result in minimal gains. We see this in the first video where the player is just spamming the strongest area of effect weapon and yet the score never swings too much to either way.
Based on these observations, these games aren’t your usual redemption games like skee ball, but are more like pachinko where playing for an indefinite amount of time is possible and in fact is the only way to gain high rewards.
Tweaking the gameplay
It’s pretty obvious that the “redemption” mechanic won’t work in an HTML5 game. The “shoot stuff to get bullets to shoot at more stuff” core mechanic is still suitable for mobile and browser play, though, so it’s only a matter of replacing the main reward scheme.
After thinking about it for a bit, I’ve found a couple of possible routes:
- Time Attack – set a limit to the energy or kills and let the players try to beat their old times.
- Survival – similar to the arcade classic Gauntlet, the game drains continuously drains energy and players try to kill as many enemies as they before they die.
- Incremental – similar to Cookie Clicker, you can spend energy to buy upgrades that will shoot enemies for you and you can just leave the game alone to let it rack up a lot of points.
Time Attack was my first choice since it’s the easiest to implement. Survival is also in because it’s practically just the opposite of Time Attack. Incremental will take a lot of trial and error to find the correct mix of upgrades so this mode is shelved (I don’t think any HTML5 engine can even handle thousands of explosions per second).
Game Theme
At that point, I’ve already figured out what I want to do but I still have to make an important decision about this game:
So what do we blow up this time?
While it would be funny if I just took assets from some other popular franchise and make my own knockoff, I wouldn’t be able to release it into the public and I won’t be able to write a post like this one. So instead of doing that, I looked around for free and legal sprite compilations for ideas on the theme of this game and eventually stumbled upon CPL-licensed compilation SpriteLib.
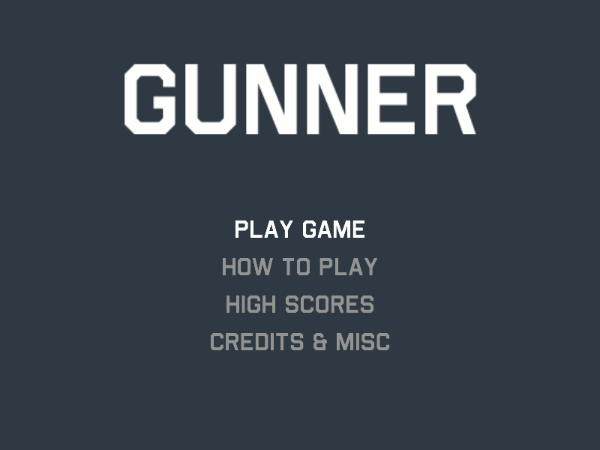
It was then that I decided that the game would be based on the WW2/1942 themed sprite sheet 1945.
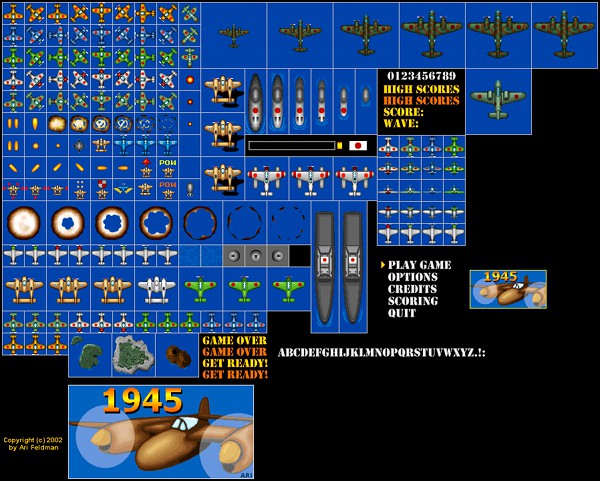
We’re going to blow up endless waves of Japanese fighter planes.
Choosing an HTML5 library
If I wanted to make a commercial game, I would’ve gone with Unity3D or some other game programming platform. But I’m not making a commercial game, and from the start I was already set on making this an HTML5 learning exercise. I’ve already made a couple of throwaway JavaScript games so I expected a relatively easy transition to Canvas/WebGL.
HTML5 game libraries tend to fall into two types. On one end you’ve got frameworks like Construct 2 and GameMaker where you write your games in a drag-and-drop visual programming environment, while on the other end you’ve got bare-bones libraries like CreateJS where you code everything in pure JavaScript.
In the end, I went with the middle ground: Phaser.
Like CreateJS, Phaser is just another library; you still program your game using plain JavaScript. Unlike CreateJS, however, Phaser is a higher level framework with common game elements like Game Loop and Physics implementations already built-in. As a web developer who has worked with frameworks like Spring and Rails for a decade, I was much more comfortable with the latter.
One downside to Phaser is that it’s relatively new and that there are a lot less developers compared to other libraries. Even with this lower profile, solutions to problems in Phaser aren’t that hard to find: it has decent documentation, a huge list of sample code, and an active forum.
Another good thing about Phaser is that the examples in the Game Mechanics Explorer site are all implemented using the said framework. As we shall see later, many of the initial implementations of the games code are directly lifted from either that site or the official examples.
From 0 to basic game in 4 days
Now that I’ve decided on the theme and the framework, it’s now time to code the basic features of the game:
- Add a basic enemy spawner
- Add basic shooting
- Add collision handling with damage and explosion animations
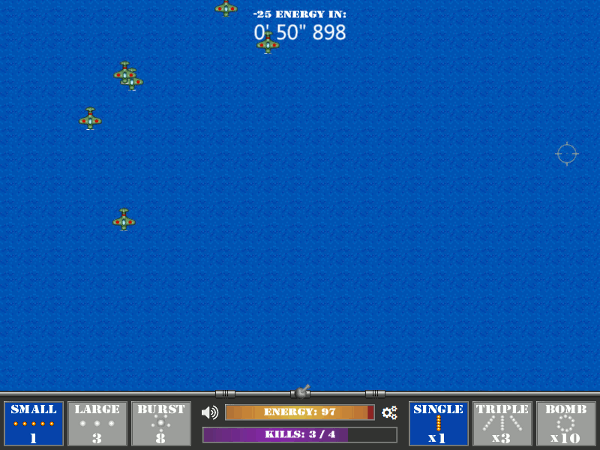
- Add energy (which is adjusted per shot and kill)
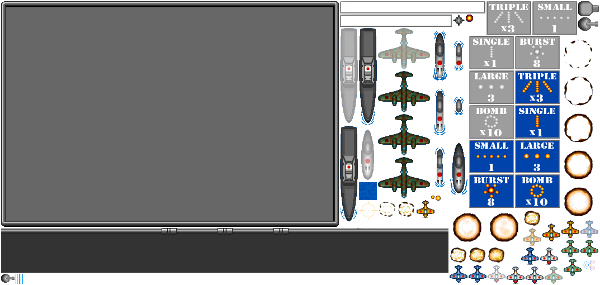
- Add relevant graphics e.g. rotating gun, energy and kill display
- Add other enemies and shot types
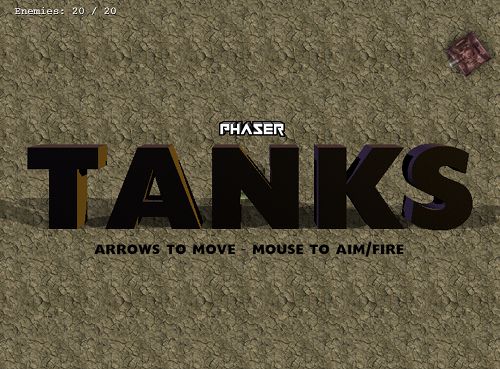
The first 3 points are easy; it’s just a matter of copying and modifying code from Phaser’s Tanks example which has shooting and explosions. Spawning enemies is also just an exercise on whether you have understood how object groups work or not.
Another good example for learning object groups is Game Mechanic Explorer’s Bullets demo:

With these sources, I had initial working game in just a few hours:
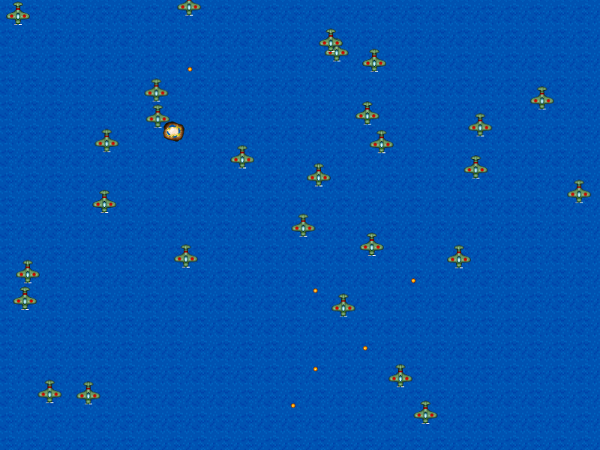
click screenshots to play the corresponding game builds
And the (very short) code:
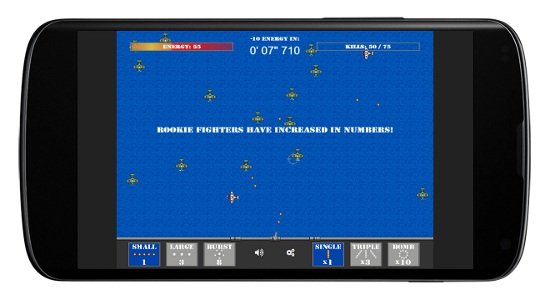
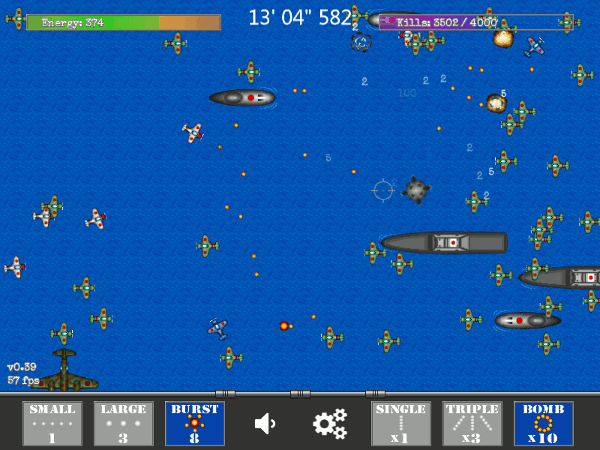
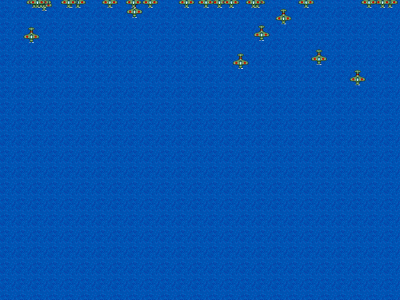
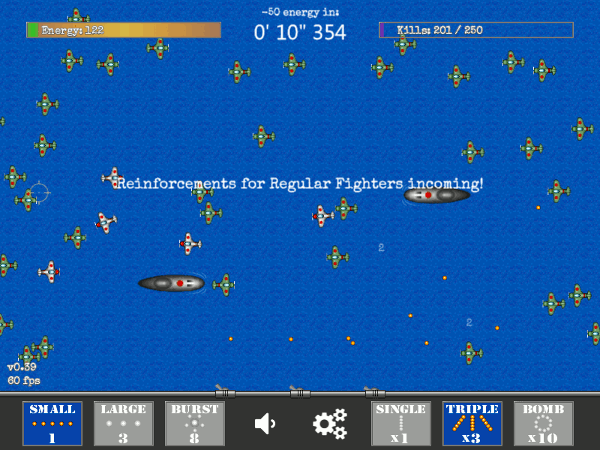
The following days had me coding the other 3 points. I went with 7 kinds of enemies to shoot at:
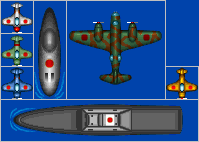
- Downward moving green planes
- Tougher horizontally moving white planes
- Horizontally moving submarines
- Even tougher and faster horizontally moving blue planes
- Large downward moving bombers
- Horizontally moving destroyers. Destroyers and subs should not overlap as they are on sea
- Fast and almost invulnerable golden planes
And 3 shot types:
- Regular shots for the early game
- Large shots for taking down tougher enemies
- Burst shots replace area-of-effect shots (which I was too lazy to implement); these larger shots burst into five small shots upon impact.
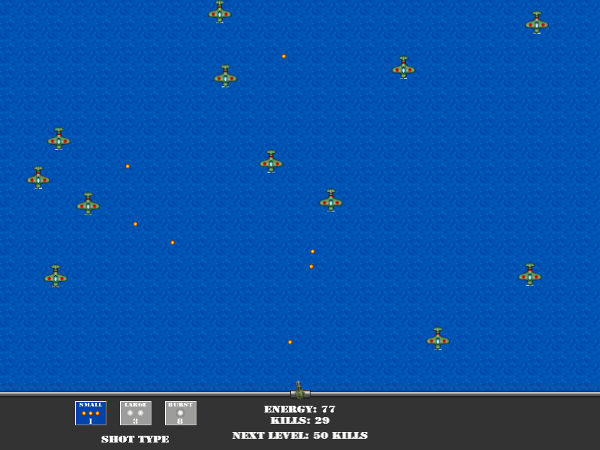
Here’s the hit probability and reward table:
|
Small |
Large |
Burst |
Energy Reward |
| Rookie (Green) |
66% |
100% |
100% |
2 |
| Regular (White) |
30% |
90% |
100% |
5 |
| Submarine |
5% |
20% |
35% |
25 |
| Veteran (Blue) |
5% |
12% |
15% |
50 |
| Bomber |
0.9% |
3% |
5% |
100 |
| Destroyer |
0.55% |
1.9% |
2.5% |
200 |
| Elite (Gold) |
0.2% |
0.8% |
1% |
500 |
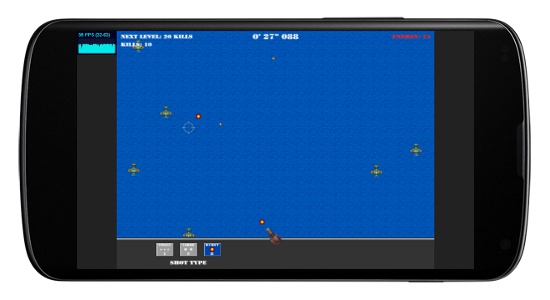
I also added a leveling up system to give a sense of progression, something that was not present in the original arcade games due to their sit-down-and-play nature. This gave the game an end state of sorts in the form of a level cap since Time Attack wasn’t in the initial list of features. In addition, I’ve set the experience point system to a flat “1 kill = 1 xp” system which gives the green planes value up to the endgame and not just be early game cannon fodder or late game bullet shields.
Here’s the result of only 4 days of on and off coding:
This is what I meant when I said “making HTML5 games is easy for a web dev” especially when using a framework like Phaser.
Then came the hard part.
“The first 90 percent of the code accounts for the first 90 percent of the development time.
The remaining 10 percent of the code accounts for the other 90 percent of the development time.”
—Tom Cargill
Things happened and I had to put off developing this game for a month or so. I came back expecting to have an easy time implementing other features that were missing from the prototype:
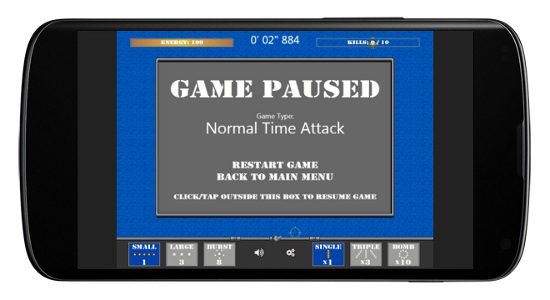
- Game modes: Time Attack and Survival
- Firing modes to complement the shot types: Triple adds 2 extra side guns while Bomb lets you drop a bomb anywhere in the screen that explodes into 10 shots.
- LocalStorage saving of high scores and previous settings
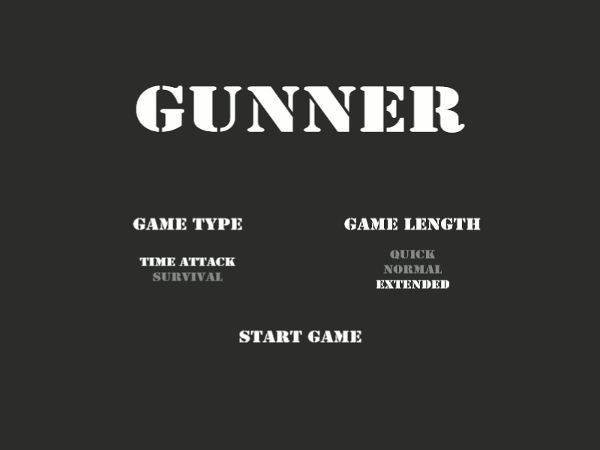
- Game menu UI for choosing game mode, viewing past scores, reading the tutorial, and so on.
As I was implementing these features, the problems started to emerge. Looking back, fixing these problems cost me more time than coding the new features; what was supposed to be a few days of effort suddenly became a few weeks.
The Problems
Designed for Desktop
Some UI problems became apparent when I tested the game on my phone and iPad for hours. Again, here’s the first major iteration of the game UI, scaled down and inserted into a phone mockup from Mockuphone:

The most glaring UI problem was the large wasted space on the deck combined with the small size of the shot type toggle buttons. This could easily be fixed by increasing the latter’s size.
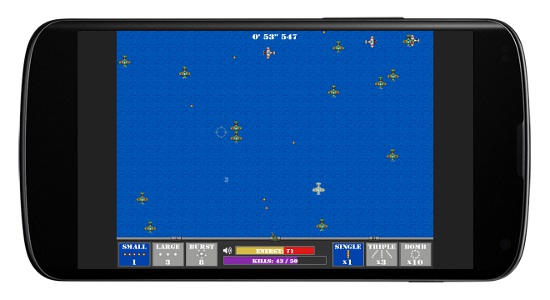
Another, more subtle, UI problem for mobile devices shows up when you try to play it with your your thumbs or index finger: doing so will make your palm cover the energy and kill counter. Players cannot see their health and progress at a glance under this scheme, even when the text was converted to colored bars.
I eventually went with the most obvious solution to the problem: just put the damn things on top.
Apart from these prominent issues, the only other flaws I encountered with the mobile UI are the spacing of the menu “buttons” which have been corrected somewhat in the later builds.
More Mobile Problems
Game Performance
I’m not fooling myself: HTML5’s performance in modern browsers and devices is decent, but it’s still not “there” yet. At the later levels, it’s almost as if my game is a benchmark for HTML5 performance seeing how laggy things can be when everything is moving and exploding.
I added Stats.js early on to see the actual performance of my game:
The histogram view was useful but slightly distracting. I replaced it later on with Phaser’s built in frame rate calculator:
With these in place, I went around and tested the game on various devices. Performance was good on high-end devices like current generation iPhone, Nexus, and Galaxy S. The game had significant amount of lag on older weaker and older devices, though, so I tried out various tweaks to see if they had any effect.
Performance Tweaks
The most obvious approach to tweaking the game would be to treat HTML5 as an old-school gaming platform reduce the amount of sprites onscreen. Unfortunately, this goes against the core of the game which can be summed up to “have a lot of sprites on the screen and blow them up”.
Past that solution, there’s really not much we can do to improve the performance of the game.
We can convert everything to object groups, but we’ve already been doing that from the start (see code above).
I also converted the web fonts to bitmap fonts due to fact that any text rendering, webfont or not, can be computationally expensive depending on the browser. Using bitmap fonts are theoretically better, the engine treats them as normal sprites so they should be rendered faster and more consistently at the price of scaling anti-alias quality.
Upon testing, these and other tweaks didn’t seem to affect the performance that much… as expected. Most of the performance was still device and browser based. For example, the game’s unplayable on Firefox on my 2 year old mid-range Android phone, but is playable even at low frame rate on Chrome on the same phone. Similarly, the game is noticeably smoother on Safari on my 3rd gen iPad than it is on Chrome.
While we’re at the topic of performance, let’s talk about packaging HTML5 apps into hybrid mobile apps.
Turning the game into a full mobile app
You can turn any HTML5 game into a full app by wrapping in a WebView of the platform of your choice. Phaser is no different.
On the other hand, WebView performance isn’t better than the performance of the native browser. There is another option for packaging HTML5 games that promises higher performance compared to plain WebViews: CocoonJS’s Canvas+ mode.
Depending on the complexity of your game, it may take too much effort to turn your game into a Canvas+ compatible app. This article lists down the main things you need to do. They range from simple (using an older compiler) to crazy (converting bitmap font to JSON and adding a polyfill to replace the non-existent XML parser with a JSON just to make custom fonts work).
I tried converting the app but quit halfway. At least I got to the point where the CocoonJS launcher can display the menu, albeit incorrectly.

Loading Speed
Aside from in-game lag, I also noticed that the game loads much slower when played online compared to local play.
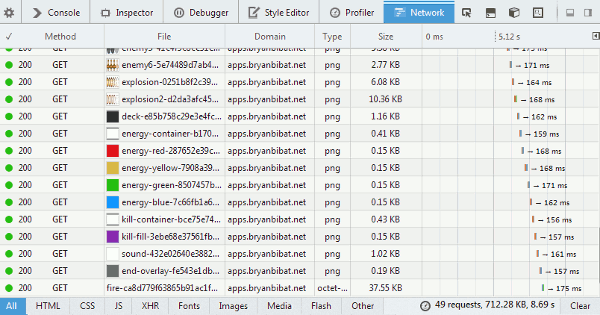
I’m already using Sprockets via sinatra-asset-pipeline the to concatenate and minify the JS and CSS files, but the way Phaser preloads assets (via XHR/AJAX) combined with the amount of different sprites I have in the game means that this simple game can take quite some time to load.
The solution here is to combine the sprites into an atlas with tools like TexturePacker and change your game to use that instead of individual images and spritesheets.
Compared to Sprockets, it’s not a total solution for game assets yet. For one, while tile sprites work with atlas, but only in certain situations that haven’t been totally pinned down yet so it’s suggested to remove them from your atlas. Bitmap fonts are also separate files from the atlas, causing 2 extra AJAX calls per font to be loaded. And finally, there’s no atlas for audio yet so while Phaser only loads the audio type suited for the browser (e.g. ogg vs mp3), it’s still an AJAX call per audio file.
Now on to other problems…
Temporal Problems
Game Length
In the early builds of the game, I tended to get too engrossed in blowing enemies up that I didn’t notice how long it took to get to the final level. It was only when I added the timer for Time Attack that I found out that I was spending 50 minutes to an hour just to reach that point in the game.
I added the Game Length setting to address this. The original game length is now called Extended while the Normal is now half of that (which makes a normal game run for 25 to 30 minutes). I’ve also added the Quick mode which are expected to run for 10 – 15 minutes, just good enough for pick-up-and-play sessions.
To implement Normal and Quick, I just assigned them a factor: Normal is 2 while Quick is 5. Time Attack is then shortened by dividing the required kills to level up by this factor. On the other hand, Survival is also shortened by setting this value as a multiplier to the energy drain factor. With Quick Survival starting at 25 energy drain, you need to be both accurate and lucky just to get past the first 5 minutes.
Pausing
Phaser’s pausing scheme also gave me a couple of problems. Pausing the game in the current version of Phaser has two side effects: first, everything is paused including the game loop. This prevents input handlers in your update() function from being called. Selective pausing will be added to later versions of Phaser, but in the meantime, there’s a workaround in the examples list which will let you do stuff while the game is paused.
The second thing to keep in mind about pausing is that it doesn’t affect the game clock time. This can cause problems when you check the game time for delayed events, say when you schedule an enemy to spawn in now + 10000, you can make that event appear to happen immediately in game terms by pausing and unpausing after a minute.
I got around this issue by doing what I should’ve been doing from the start and use custom timers in place of the game time. In the later builds of the game, everything related to time (e.g. enemy spawning, shot cooldown) are handled by timers.
—
Let’s close this list of problems with the one that I see every time I let someone else play the game.
WTH is this game?!?
People don’t immediately get what the game is all about when you show it to them. This is also a problem with the arcade games where I see kids lose less than a minute of starting a new game.
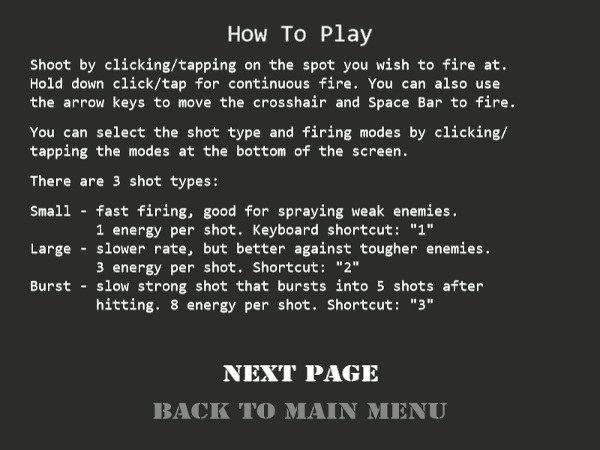
A working How to Play section has been around since version 0.37 but players tend to skip it so I added a pre-game message summarizing what the game is all about in the next version:
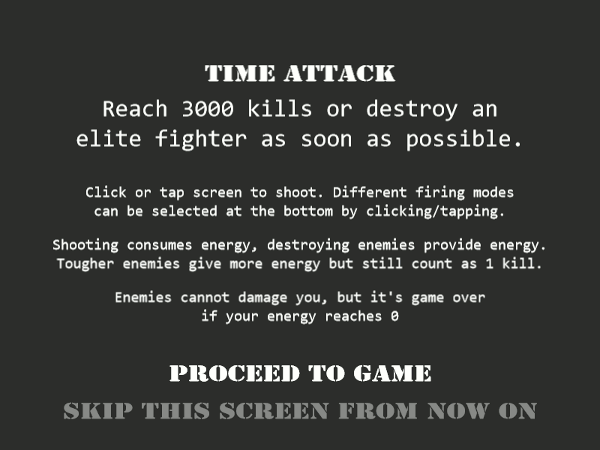
Even with this screen, new players still had an awkward few minutes before understanding what the game is about. It was then that I realized that the first thing that comes into their heads when they see enemies moving towards them is to think that it’s a defense game.
Since then, the early enemies now move horizontally and the player’s “ship” now “moves” parallel to them. Almost all of the fishing game variations use this style; the only one I found that had enemies rushing towards you is one with a damage mechanic.
In closing…
August’s a busy month so I’ll have to shelve this project again. I still have a bunch of things that I want to add to the game but they can wait.
You can play the latest version of the game at http://datenshizero.github.io/gunner/. The latest code is also hosted at Github.
This whole experience supported what many already know: one of the best ways to learn a new technology is to think of a project you want to make and try to build it using that new technology.
—
Shameless plug: if you want to learn more about creating HTML5 games in Phaser, head to Leanpub and grab a copy of my free book!