
So you want to be a bit productive this holiday/winter/end-of-year break and decide to learn how to setup your own website.
But for some odd reason you don’t want to settle with a free website service like WordPress or even a cPanel managed shared hosting site. Instead, you want to know how to setup your own web server, something like a Linode VPS or an Amazon EC2 instance.
Luckily for you, I’m having a bit of a writer’s block and I have time to write about how to learn setting up a Linux server without having to pull out your credit card.
What this post is all about
In this post, we’ll just discuss how to set up a virtual server on your computer.
Yes, that’s right. We’re not installing a server OS on a spare machine, nor are we dual-booting: we’ll be setting up a server in your desktop, running the former inside the latter. This is virtualization, dawg.
We’ll be creating a server with somewhat similar specs to what you’d get if you sign up for $8 a month at prgmr.com. This simulated environment will be enough for a newbie to learn the ropes in server management.
What you need
Any relatively modern desktop or laptop computer will do. For this series of posts, I’ll be forgoing the use of my quad-core gaming rig and instead use my laptop (dual-core @ 2.1GHz with 3GB RAM). For the sake of the majority of the readers, I’ll be using Windows 7 as the OS though the steps will almost be the same when using Windows XP and Vista, and will still be similar even when using Linux or OSX.
You also need to be connected to a network, preferably one that gives out local IP addresses via a DHCP server. In other words, a home/office router. Fast internet also helps as you need to download >700MB worth of installer data.
As for the software, you will need to download VirtualBox and a CD image (.iso) for Ubuntu Server 10.04.3 Long Term Support 32-bit. The VirtualBox download and installation is pretty straightforward, but for the Ubuntu Server 10.04.3, you may want to choose downloading via BitTorrent for faster download speed.
Unlike Linux and OSX users who already have it built in on their terminals, Windows users will also have to download an SSH client like PuTTy, the one that you’ll see in this tutorial.
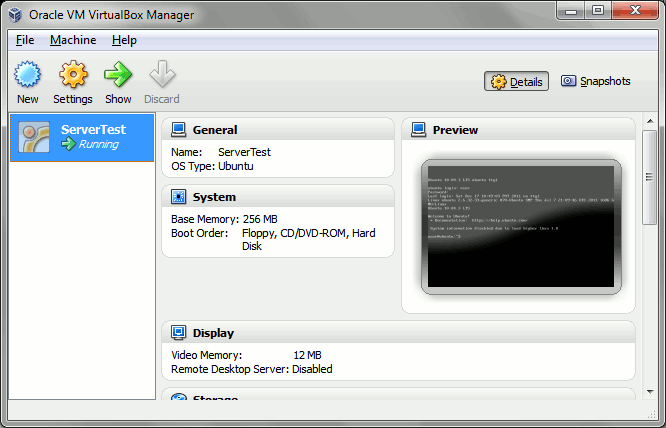
Creating a Virtual Machine
Once you’ve installed VirtualBox, it’s time to create a new virtual machine. Click the New button and use the following settings:
- Name: any name, I named mine “ServerTest”
- OS Type: Linux, Version: Ubuntu
- Base Memory Size: 256MB
- Start-up Disk: Create new hard disk (VDI, Dynamically Allocated, 6GB)
Before we start installing Ubuntu Server, we’ll have to change some settings (right-click machine -> Settings, or just click the Settings button).
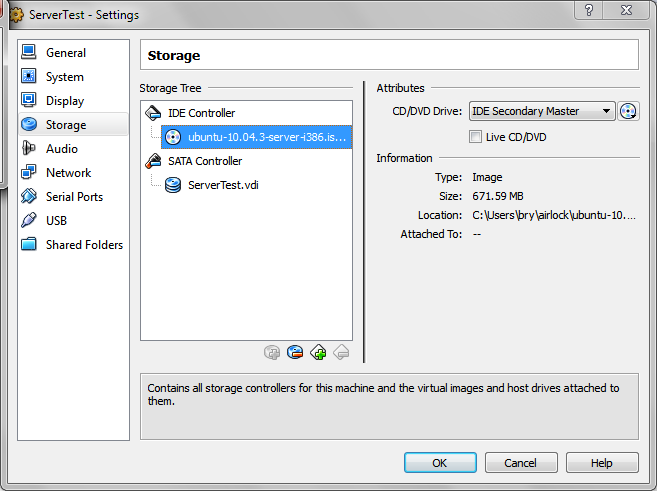
In the Storage settings, select the “Empty” CD/DVD drive under the IDE Controller then set the Ubuntu Server image as the current CD by clicking the CD icon in the Attributes area on the right side.
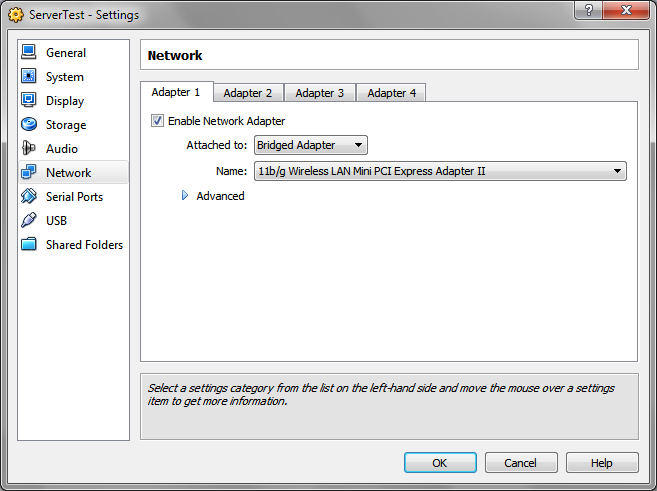
In the Network settings, change the network adapter from NAT to Bridged Adapter. This will allow your virtual machine to get a local IP address from the router, in turn allowing it to behave as though it was a real server connected to the network.
Click Ok to apply the changes.
Installing Ubuntu Server 10.04.3 LTS
Upon starting the machine (right-click machine -> Start, or just click the Start button), the system will boot the Ubuntu Server installer. The steps here are pretty straightforward:
- Arrow and Tab keys and move the cursor/selection while Enter key “clicks” the selected option. The Space Bar “ticks” the selected option in certain pages.
- There are times when VirtualBox seems to “hold” the mouse pointer. You press the Right Ctrl Key to make VirtualBox “let go” of the pointer.
- Select “English” and “Install Ubuntu Server”. This will initiate the actual installer.
- Select “English”, “Philippines”
- Say “No” to the Detect Keyboard Layout then simply choose “USA”, “USA”
- Choose a host name. The default “ubuntu” is fine.
- Choose a host name of your choice. The default “ubuntu” is fine.
- Asia/Manila is the correct time zone (“Yes”)
- Choose the default options for setting up the drive partitions (“Guided – use entire disk and set up LVM”, first drive, “Yes”, “6.2GB”). Select “Yes” when asked if you wish to continue.
- Your full name can be anything. On the other hand, your user name and password are important because it’s what you use for logging in. For this tutorial, I used the username “user” and a simple password (ignore security for now).
- Continuing our disregard for security, we skip encryption of the home folder as well as setting up automatic updates.
- Don’t tick anything for installation. We’ll do it manually later.
- Say “Yes” to installing GRUB.
Once the whole thing is finished, select “Continue”. This will restart the machine and somehow it will boot using our freshly installed OS and skip the CD for now. Now is a good time to go to the settings and change the CD drive to “Empty” again via the “Remove disk from virtual drive” option.
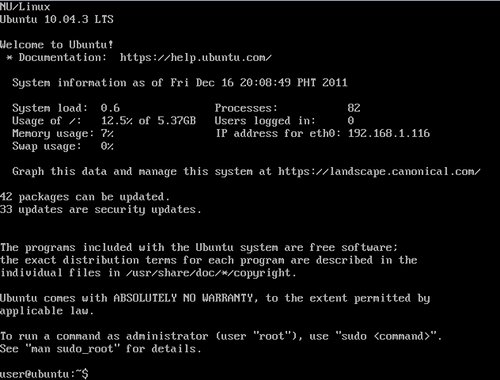
Enter the user name and password to login.
Congratulations, you now have a working virtual server.
Installing SSH server
When we’re managing servers, we rarely have direct physical access to the machine hardware.
For this tutorial, we’ll use SSH to manage the server pseudo-remotely. Not only will this simulate how one usually manages rented servers (as every VPS and cloud solution uses it), this will also get around the ugly and slow to respond server console that VirtualBox displays to us.
First step is to actually install the SSH server. Enter the following commands in the server console:
$ sudo apt-get update
$ sudo apt-get install openssh-server
The first command will ask for your password. This is because sudo tells Linux to run the command as the “super user”, hence allowing us to do things that are typically restricted from normal users. Later sudo prefixed commands will not require re-entering the password until the OS “forgets” you (e.g. you don’t use sudo for a certain amount of time).
The two commands above are used to install packages (e.g. programs or libraries) in Debian variants of Linux. The first command, apt-get update, updates the local database of available packages for download and installation by browsing the repositories defined in the /etc/apt/sources.list (the official repositories for your installed OS are enabled here by default).
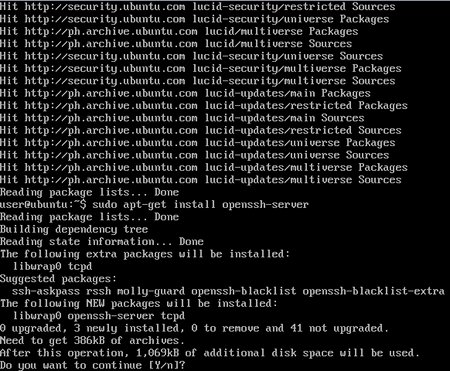
The second command, apt-get install, installs the list of packages that you pass to it, including the packages’ dependencies. As you can see here, openssh-server requires libwrap0 and tcpd. Enter “y” to proceed with installation. (Pressing Enter without entering anything does the same thing. This is because “Y” is the default answer as denoted by its capitalization in the yes-or-no “Y/n”.)
Once installed, you can now remotely connect to the machine via SSH.
Remote management via SSH
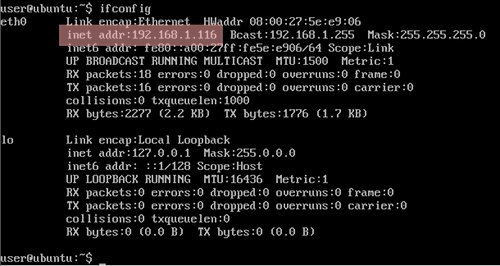
Before you can connect to your server, you must first identify its local IP address. This should be included in the system information that you get upon logging in.

in this case the IP address is 192.168.1.116
If you didn’t take note of the IP address or if the system failed to provide it, you can still get it via the ifconfig command.
You can now connect to it via PuTTY as long as you know the IP address.
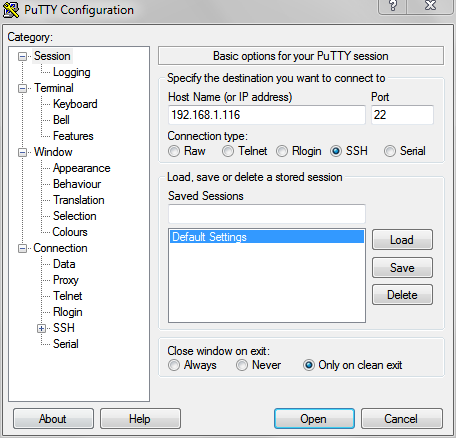
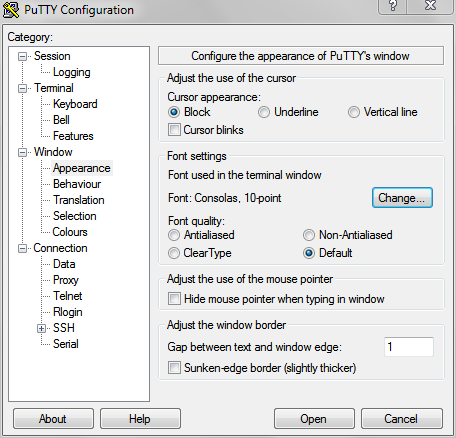
Before you connect, you may want to change some settings (e.g. changing the font to Consolas) and saving the session for future use.
Linux and OSX users can simply use the built in SSH client installed in their terminals with the following command:
$ ssh username@ip-address
Upon connecting to your server, both PuTTy and the terminal client will tell you the server fingerprint and will ask if you want to proceed. Obviously you’d want to proceed. Then you’ll be asked for your login credentials. Enter them to continue.

Now you’re connected to the server via an SSH client. Not only does your terminal look prettier than the one provided by the server, you can also copy-paste things from the clipboard now.
Learn the terminal
For terminal newbies, it’s now a good time to learn command line commands. Go to Zed Shaw’s command line crash course Controlling Your Computer From The Terminal and run through the whole thing.
And this ends this part of the tutorial. We will leave installing web server components to the later parts.
To shutdown your server, you can use the shutdown command:
$ sudo shutdown -h now

[…] At the first part, we set up the virtual machine. Now we’ll be setting up the web server itself. […]
[…] a quick update to this mini-tutorial. Previous parts can be found here and […]
Hi,
Very nice article.
I found that the link to ‘Zed Shaw’s command line crash course’ is broken.
Any recommended alternatives?
Also, I believe it can be updated with new versions of the tools you mention. i.e. VirtualBox, Putty and Ubuntu installer.
Cheers Mate!
Link fixed