
Here’s the next part of my basic web server administration tutorial.
At the first part, we set up the virtual machine. Now we’ll be setting up the web server itself.
Set Static IP Address and fake Domain Name
Before we could proceed with installing our web server, let’s do a couple of things to make our server behave more like a “normal” server.
First is to set our server’s IP address to a static IP address. There are a bunch of ways to do this (e.g. change the router settings), but we’ll just go with changing our server’s settings
Running ifconfig and route will give us the current IP address and gateway.
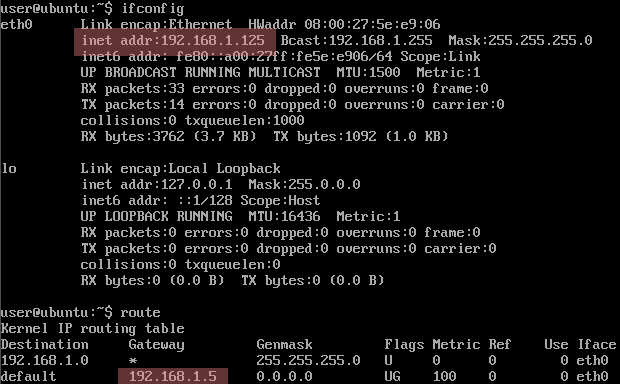
In this case, the new IP address is 192.168.1.125 and the gateway is 192.168.1.5. We can now apply these settings to /etc/network/interfaces. Open the said file via:
$ sudo vim /etc/network/interfaces
(For this tutorial, I’ll be using vim as the default text editor. If you find vim too daunting, you can replace all instances of vim with nano)
It will look something like:
# This file describes the network interfaces available on your system
# and how to activate them. For more information, see interfaces(5).

# The loopback network interface
auto lo
iface lo inet loopback

# The primary network interface
auto eth0
iface eth0 inet dhcp
Now replace the last line with the following:
iface eth0 inet static
address [address here]
netmask 255.255.255.0
gateway [gateway here]
for example:
iface eth0 inet static
address 192.168.1.125
netmask 255.255.255.0
gateway 192.168.1.5
To make sure you got the static IP settings correctly, you can restart the server via
$ sudo shutdown -r now
or you could just simply restart the network interface:
$ sudo /etc/init.d/networking restart
Here we see the /etc/init.d folder where the init scripts (like networking) are placed. Aside from being executed automatically upon boot to start services, they can also be used to stop or restart the said services just like what we just did with networking. We will see more of /etc/init.d/ later in this tutorial.
Now that we’ve set the IP address as static, it’s time to set a fake domain name.
Normally, when you’ve got a server with a static IP address, you’d have to go and buy a domain name from a registrar like Namecheap and you’d go through the steps in linking that name with the IP address and waiting for the DNS propagation.
For this tutorial, we’re going to skip all that by faking it with the hosts file.
First let’s update the server’s /etc/hosts file to add our fake domain name “mysite.dev”:
sudo vim /etc/hosts
Add the line at the end:
192.168.1.125 mysite.dev
You can verify the new setting by using the ping command.
user@ubuntu:~$ ping -c 4 mysite.dev
PING mysite.dev (192.168.1.125) 56(84) bytes of data.
64 bytes from mysite.dev (192.168.1.125): icmp_seq=1 ttl=64 time=0.172 ms
64 bytes from mysite.dev (192.168.1.125): icmp_seq=2 ttl=64 time=2.38 ms
64 bytes from mysite.dev (192.168.1.125): icmp_seq=3 ttl=64 time=3.34 ms
64 bytes from mysite.dev (192.168.1.125): icmp_seq=4 ttl=64 time=1.59 ms

--- mysite.dev ping statistics ---
4 packets transmitted, 4 received, 0% packet loss, time 3016ms
rtt min/avg/max/mdev = 0.172/1.874/3.342/1.161 ms
user@ubuntu:~$
Now let’s apply the fake domain name mapping to the host Windows computer. Like in Linux, the hosts file in Windows requires admin privileges so we first need to run the text editor as Administrator in order to allow us to modify it.

Right-click Notepad and select “Run as administrator”. Once open, you can now add the “192.168.1.125 mysite.dev” to the end of the C:\Windows\System32\drivers\etc\hosts file.
Now you could change the PuTTy settings to use “mysite.dev” instead of the actual IP address.
The actual installation of the web server below the cut.
Installing Nginx
It’s finally time to install the web server.
We won’t be using Apache, though. Instead, we’re going to go with its leaner and faster Russian counterpart nginx. We’re also going to build it from scratch (as opposed to getting it from a repository) to show you how its done in Linux machines.
Installing dependencies
We’ll need to install a few things before we could proceed with building nginx.
$ sudo apt-get install build-essential libssl-dev libpcre3-dev
build-essential contains the essential tools for compiling programs from source while the other two are libraries that nginx needs during compilation.
Building from source
~$ wget http://nginx.org/download/nginx-1.0.11.tar.gz
Using wget we download the latest stable source as of this writing. Yes, it’s a whopping 700 KB.
~$ tar zxvf nginx-1.0.11.tar.gz
We then unpack it using tar.
~$ cd nginx-1.0.11

~/nginx-1.0.11$ ./configure --sbin-path=/usr/local/sbin --with-http_ssl_module --without-mail_pop3_module --without-mail_imap_module --without-mail_smtp_module --with-http_stub_status_module

~/nginx-1.0.11$ make

~/nginx-1.0.11$ sudo make install
Now we finally perform the build/installation. This three-step configure-build-install scheme is pretty much how one builds any program in Linux from scratch.
This nginx build doesn’t come with an init script so we’ll have to download one off the net.
~/nginx-1.0.11$ cd ~

~$ wget https://raw.github.com/JasonGiedymin/nginx-init-ubuntu/master/nginx

~$ sudo mv nginx /etc/init.d/nginx
We still need to set a couple of things with the script:
$ sudo chmod +x /etc/init.d/nginx

$ sudo chown root:root /etc/init.d/nginx
The first command sets the script to executable and the other command gives the ownership of the script to root. Now we can run nginx:
$ sudo /etc/init.d/nginx start
You can now open http://mysite.dev to check if it’s installed properly.
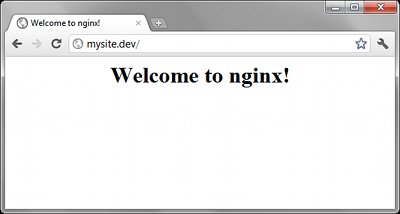
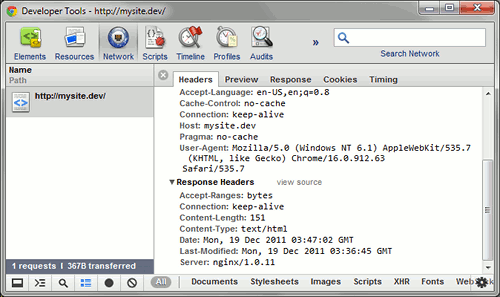
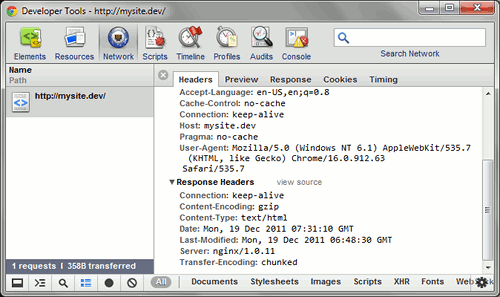
Using Firebug or Chrome Developer tools will confirm the server’s really nginx 1.0.11.
Tweaking nginx
Before we proceed with installing PHP, let’s apply some tweaks to nginx to make it more Apache-ish (lol) and then some.
$ sudo ln -s /usr/local/nginx/conf /etc/nginx
This creates a symbolic link in the /etc folder to match with the convention for configuration files.
$ sudo vim /etc/nginx/nginx.conf
Now we edit the configuration file like so:
user  www-data;
worker_processes  1;

pid        /var/run/nginx.pid;

events {
    worker_connections  1024;
}

http {
    include       mime.types;
    default_type  application/octet-stream;

    gzip on;
    gzip_buffers 16 8k;
    gzip_disable "MSIE [1-6]\.";
    gzip_proxied any;
    gzip_types text/plain text/css application/json application/x-javascript text/xml application/xml application/xml+rss text/javascript;

    log_format  main  '$remote_addr - $remote_user [$time_local] "$request" '
                      '$status $body_bytes_sent "$http_referer" '
                      '"$http_user_agent" "$http_x_forwarded_for"';

    access_log  /var/log/nginx/access.log  main;
    error_log  /var/log/nginx/error.log  debug;

    sendfile        on;
    keepalive_timeout  3;
    index              index.html index.htm;

    server {
        listen       80;
        server_name *.mysite.dev;
        root /var/www;

        if ($http_host != "mysite.dev") {
                rewrite ^ http://mysite.dev$request_uri permanent;
        }

        # Deny all attempts to access hidden files such as .htaccess, .htpasswd, .DS_Store (Mac).
        location ~ /\. {
                deny all;
                access_log off;
                log_not_found off;
        }

    }

}
A quick summary of the changes:
- We changed the server’s user from “nobody” to the system user “www-data”, the default user for web servers.
- We set the file where the PID for the server would be located. This will allow our init script to stop or restart the server.
- We enabled gzip for supported browsers to dramatically reduce the bandwidth usage.
- We set the log to match Apache’s format.
- We defined a handler for the
*.mysite.devdomain, defining its root to be the same as Apache’s (/var/www)
Now to wrap things up:
$ sudo cp -r /usr/local/nginx/html /var/www

$ sudo chown -R www-data:www-data /var/www
We copy the html folder to /var/www and give it to www-data.
$ sudo mkdir /var/log/nginx
Just creating the log folder.
$ sudo /etc/init.d/nginx destroy

$ sudo /etc/init.d/nginx start
We force stop the server (as we haven’t defined the PID file when we started it) then start it normally.
Opening http://mysite.dev now shows us that the site is served as gzipped.
Installing PHP-FPM
Unlike nginx, we won’t be building PHP from scratch. We will, however, not go with Apache’s mod_php/extension route and instead go the PHP-FPM route which, like nginx, is much leaner than the former.
Since PHP-FPM isn’t available in the official apt repositories of Ubuntu 10.04, we will have to use another repository. Nginx’s repositories may be a bit out of date (PHP v5.3.5 vs the current v5.3.8) but it should be enough for this tutorial.
$ sudo apt-get install python-software-properties

$ sudo add-apt-repository ppa:nginx/php5

$ sudo apt-get update

$ sudo apt-get install php5-fpm
The steps above will install PHP-FPM with fairly decent defaults. If you want to change some settings, you can modify the files at /etc/php5/fpm/ and restart the server via “sudo /etc/init.d/php-fpm restart“.
Now all we need to do is to tell nginx how to use PHP-FPM. Here’s our modified /etc/nginx/nginx.conf:
user  www-data;
worker_processes  1;

pid        /var/run/nginx.pid;

events {
    worker_connections  1024;
}

http {
    include       mime.types;
    default_type  application/octet-stream;

    gzip on;
    gzip_buffers 16 8k;
    gzip_disable "MSIE [1-6]\.";
    gzip_proxied any;
    gzip_types text/plain text/css application/json application/x-javascript text/xml application/xml application/xml+rss text/javascript;

    log_format  main  '$remote_addr - $remote_user [$time_local] "$request" '
                      '$status $body_bytes_sent "$http_referer" '
                      '"$http_user_agent" "$http_x_forwarded_for"';

    access_log  /var/log/nginx/access.log  main;
    error_log  /var/log/nginx/error.log  debug;

    sendfile        on;
    keepalive_timeout  3;
    index              index.php index.html index.htm;

    upstream php {
        server 127.0.0.1:9000;
    }

    server {
        listen       80;
        server_name *.mysite.dev;
        root /var/www;

        if ($http_host != "mysite.dev") {
                rewrite ^ http://mysite.dev$request_uri permanent;
        }

        # Deny all attempts to access hidden files such as .htaccess, .htpasswd, .DS_Store (Mac).
        location ~ /\. {
                deny all;
                access_log off;
                log_not_found off;
        }

        location ~ \.php$ {
                include fastcgi_params;
                fastcgi_index index.php;
                fastcgi_param SCRIPT_FILENAME $document_root$fastcgi_script_name;
                fastcgi_pass php;
        }
    }
}
The main changes between the original are:
- Adding “
index.php” before “index.html index.htm” to let the server prioritize the former over the latter. - The addition of the
upstream phpblock that points to PHP-FPM. - The addition of the
locationhandler for PHP files.
We also need to modify /etc/nginx/fastcgi_params, adding the following lines at the end of the file:
fastcgi_connect_timeout 60;
fastcgi_send_timeout 180;
fastcgi_read_timeout 180;
fastcgi_buffer_size 128k;
fastcgi_buffers 4 256k;
fastcgi_busy_buffers_size 256k;
fastcgi_temp_file_write_size 256k;
fastcgi_intercept_errors on;
Once done we can now restart the server via sudo /etc/init.d/nginx restart.
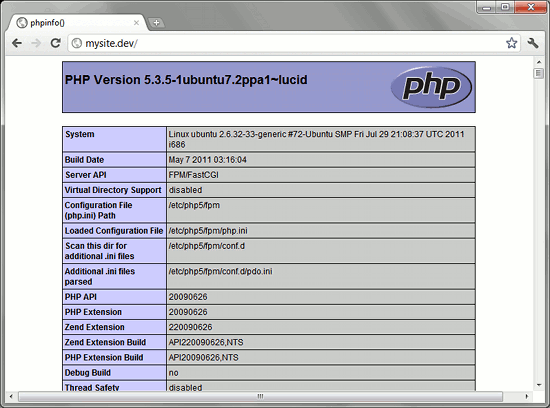
To test PHP, create the phpinfo() index.php file:
$ sudo sh -c 'echo "<? phpinfo();" > /var/www/index.php'
Then open http://mysite.dev again:
You have now installed nginx and PHP on your web server.
Benchmarking
You can use ApacheBench to see how well your site performs under load.
$ sudo apt-get install apache2-utils
Here’s 1000 requests with 100 concurrent users (10 requests each user) to our static HTML file:
user@ubuntu:~$ ab -n 1000 -c 100 http://mysite.dev/index.html
This is ApacheBench, Version 2.3 <$Revision: 655654 $>
Copyright 1996 Adam Twiss, Zeus Technology Ltd, http://www.zeustech.net/
Licensed to The Apache Software Foundation, http://www.apache.org/

Benchmarking mysite.dev (be patient)
Completed 100 requests
Completed 200 requests
Completed 300 requests
Completed 400 requests
Completed 500 requests
Completed 600 requests
Completed 700 requests
Completed 800 requests
Completed 900 requests
Completed 1000 requests
Finished 1000 requests


Server Software:        nginx/1.0.11
Server Hostname:        mysite.dev
Server Port:            80

Document Path:          /index.html
Document Length:        151 bytes

Concurrency Level:      100
Time taken for tests:   1.720 seconds
Complete requests:      1000
Failed requests:        0
Write errors:           0
Total transferred:      378290 bytes
HTML transferred:       157795 bytes
Requests per second:    581.31 [#/sec] (mean)
Time per request:       172.025 [ms] (mean)
Time per request:       1.720 [ms] (mean, across all concurrent requests)
Transfer rate:          214.75 [Kbytes/sec] received

Connection Times (ms)
              min  mean[+/-sd] median   max
Connect:       27   79  15.7     84     102
Processing:    39   83  16.5     86     131
Waiting:       10   61  17.5     65      98
Total:        129  161  16.5    172     184

Percentage of the requests served within a certain time (ms)
  50%    172
  66%    173
  75%    173
  80%    173
  90%    178
  95%    182
  98%    183
  99%    183
 100%    184 (longest request)
Here’s the same test against our phpinfo() page:
user@ubuntu:~$ ab -n 1000 -c 100 http://mysite.dev/
This is ApacheBench, Version 2.3 <$Revision: 655654 $>
Copyright 1996 Adam Twiss, Zeus Technology Ltd, http://www.zeustech.net/
Licensed to The Apache Software Foundation, http://www.apache.org/

Benchmarking mysite.dev (be patient)
Completed 100 requests
Completed 200 requests
Completed 300 requests
Completed 400 requests
Completed 500 requests
Completed 600 requests
Completed 700 requests
Completed 800 requests
Completed 900 requests
Completed 1000 requests
Finished 1000 requests


Server Software:        nginx/1.0.11
Server Hostname:        mysite.dev
Server Port:            80

Document Path:          /
Document Length:        42481 bytes

Concurrency Level:      100
Time taken for tests:   8.582 seconds
Complete requests:      1000
Failed requests:        0
Write errors:           0
Total transferred:      42649000 bytes
HTML transferred:       42481000 bytes
Requests per second:    116.52 [#/sec] (mean)
Time per request:       858.186 [ms] (mean)
Time per request:       8.582 [ms] (mean, across all concurrent requests)
Transfer rate:          4853.19 [Kbytes/sec] received

Connection Times (ms)
              min  mean[+/-sd] median   max
Connect:        0    6  16.6      0      63
Processing:    66  810 126.3    861     875
Waiting:       59  808 127.0    858     873
Total:        125  816 113.2    861     875

Percentage of the requests served within a certain time (ms)
  50%    861
  66%    862
  75%    863
  80%    864
  90%    869
  95%    874
  98%    874
  99%    875
 100%    875 (longest request)
581 and 116 requests per second? Not bad for a “low end” server.

[…] Proceed to part 2: Installing Nginx and PHP […]
[…] Here’s a quick update to this mini-tutorial. Previous parts can be found here and here. […]